
2. Installation, License Activation, and File Locations
2.1 Installation
Supported Environments and Plugin Formats
Synth-80 supports Windows and macOS.
| Format | Windows | macOS | Notes |
|---|---|---|---|
| VST3 | ○ | ○ | Works in many DAWs |
| AU | – | ○ | macOS only (Logic Pro, etc.) |
| AAX | ○ | ○ | For Pro Tools |
| Standalone | ○ | ○ | Runs on its own without a DAW |
A standalone plugin called Synth-80 FX, which contains only the effects chain, is also included. This is an audio effect with no synth sound-generation section, intended to let you insert the same 5-slot Effect Chain found in Synth-80 itself onto other tracks. For details on the effects, see → Chapter 9 "Effects".
Running the Installer
Open the installer you downloaded (an installer executable on Windows, a pkg on macOS) and follow the on-screen instructions. Each plugin format will be placed in your OS's standard plugin folder.
After installation, run a plugin scan (rescan) in your DAW, and Synth-80 and Synth-80 FX will appear in the list. The scanning procedure differs from one DAW to another, so please refer to the manual for your DAW.
Note
The Windows installer may display a security warning. The application is correctly signed, so if a warning appears, click "More info" to confirm the publisher, and then choose "Run".
Using the Standalone Version
To use Synth-80 on its own without going through a DAW, launch the Standalone version. On first launch, the audio output device and MIDI input device may still be at their defaults. If you get no sound, or the plugin does not respond to your keyboard, reselect the audio/MIDI devices from the settings menu of the Standalone version.
2.2 First Launch
When you load Synth-80 onto a track in your DAW, the activation dialog appears automatically while the plugin is unactivated. Here you choose from the following three options.
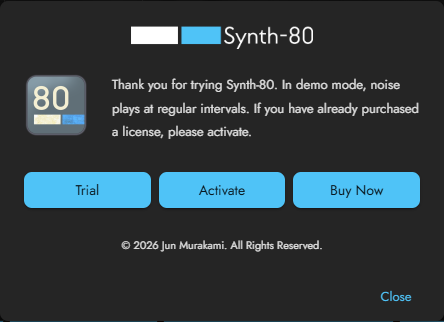
| Option | Action |
|---|---|
| Trial | Closes the dialog and lets you start using the demo as-is |
| Activate | Proceeds to the login/activation screen (see 2.3 and 2.4) |
| Buy Now | Opens the product page in your system browser (see 2.5) |
About the Demo Noise
While unactivated (in demo mode), demo noise is added to the final output stage at regular intervals.
Once you activate a valid license, the demo noise is removed.
2.3 Online Activation
When you choose "Activate", you proceed to the license activation screen. There are online activation and offline activation, and online activation has two paths.
Logging In with Google / Apple (Device Code Method)
When logging in with a Google or Apple account, the process uses the device code method, which uses your OS's browser. The procedure is as follows.
- A code for display (userCode) appears in the plugin.
- Your system browser opens. In the browser, log in to the account you created at the time of purchase.
- The browser shows a confirmation asking "Do you want to authorize this device?". Confirm that it matches the code shown in the plugin, and explicitly approve it.
- Once you approve, you return to the plugin and activation is complete.
Caution
This device code expires in 10 minutes. If you were unable to approve it within the time limit, start over from the login. Do not approve a code you do not recognize (the approval confirmation screen exists to prevent the trick of sending a code to a third party).
Logging In with Email Address and Password
Enter the email address and password of the account that purchased the product into the form inside the plugin. This path is completed entirely within the plugin. Once login succeeds, your license is imported automatically and activation is complete.
If you have forgotten your password, you can reset it from the password reset on the same screen (a reset email will be sent to you).
About the Issued License
When activation succeeds, the license is saved to your environment. This license has the following properties.
- On a different OS, or if you reinstall the OS, you can restore the license by reactivating with the same account.
- The license is tied to the purchaser's email address and display name. You cannot transfer the license to another person.
- If you modify the license file, or put in a file for a different product, verification fails and it will not activate.
2.4 Key File Activation
If you want to activate offline, or want to keep a copy of your license on hand in case you need to reinstall, use a key file. The key file extension is .s80key.
Obtaining and Importing the Key File
- Log in to the website at https://jun-murakami.web.app/account (the account screen) and download the key file for the license you hold.
- Drag and drop the downloaded
.s80keyfile onto the plugin's activation screen. Alternatively, load it from the file selector on the screen. - The signature is verified, and if there are no problems, activation is complete.
Note
Whether imported via online activation or via a key file, the result is ultimately saved in the same format and the same location (for the save location, see "2.7 Settings File Locations"). Whichever method you use to activate, there is no difference in the state after activation.
2.5 Purchase and Account
Purchasing
You can purchase Synth-80 from the product page https://jun-murakami.web.app/synth-80. Logging in is required at the time of purchase. This is to reliably tie the purchase process (the Paddle checkout) to the account you are logged in to. Once the purchase is complete, the license is issued to that account.
The Account Screen
On the website's account screen at https://jun-murakami.web.app/account, you can view a list of the licenses you hold. From here, you can download the key file (.s80key) for each license (see 2.4).
2.6 Preset Location
After installation, sound presets are saved under your OS's Documents folder, at Documents/Synth-80/. On both Windows and macOS, this folder name (Synth-80) is the same.
- The unit of storage is the Patch (
.80p). A single Patch bundles together the Upper Tone and Lower Tone, performance settings, Effect Chain, and Patch Volume (for the concept of a Patch, see → Chapter 5 "Understanding Preset / Patch / Tone"). - Category folders (
Bass,Lead,Pad & Strings, etc.) are placed directly under the preset root.
An example of the save location structure is as follows.
Documents/
└── Synth-80/
    ├── Bass/
    │   └── Fat Unison.80p
    ├── Lead/
    │   └── Sync Lead.80p
    └── Pad & Strings/
        └── Bright Strings.80p
Note
A Patch name equals its file name. If you change the file name, that becomes the name of the Patch.
2.7 Settings File Locations
The presets themselves are placed in Documents as described in the previous section, but the license file, UI settings, window size, and the placement state of the Factory presets are saved separately in your OS's standard application settings folder. This folder is also named Synth-80 (with a hyphen). These files are not usually something the user needs to interact with directly, but they can be useful for backup or troubleshooting.
Windows:
%APPDATA%\Synth-80\
├── Synth80.s80key
├── preferences.json
├── window-state.json
└── factory-presets.json
macOS:
~/Library/Application Support/Synth-80/
├── Synth80.s80key
├── preferences.json
├── window-state.json
└── factory-presets.json
The role of each file is as follows.
| File | Role |
|---|---|
Synth80.s80key | The license itself. Saved here for both online activation and key file activation |
preferences.json | UI settings such as the hint language |
window-state.json | The last window size used |
factory-presets.json | The placement state of the Factory presets (which have been seeded, and which are treated as deleted) |