
9. Effects
In addition to the sound itself (Tone), Synth-80 provides effects for shaping the final texture and sense of space. These were not present on the actual MKS-80; they have been added so that Synth-80 produces a "ready-to-use sound" in modern production environments.
The effects are organized as a serial chain of 5 slots. You can build up processing such as thickening the sound with a chorus, adding depth with a delay, and finally placing it in a space with a reverb. Each slot can be assigned one of 12 effects (or Off), and the signal flows from left to right.
Note
The effects sit on a different layer from the Tone (the Upper / Lower sounds), and only a single effect chain is applied to the entire Patch. You cannot apply separate effects to Upper and Lower. For the Patch / Tone hierarchy, see → Chapter 5 "Understanding Preset / Patch / Tone".

9.1 How the Effect Chain Works
Serial Chain of 5 Slots
The effects area consists of five slots (tabs), and the signal flows serially from left to right in the order Slot 1 → Slot 2 → Slot 3 → Slot 4 → Slot 5. The "→" between tabs indicates the direction of this signal flow.
- Clicking the body of a tab displays that slot's edit page (its knobs) at the bottom.
- Clicking the "▼" on the right side of a tab lets you choose the type of effect assigned to that slot.
- The small dot (an LED-style indicator) at the left edge of each tab is that slot's Bypass toggle. Lit = enabled, unlit = bypassed. Clicking it switches the slot ON / OFF on the spot and at the same time makes that slot the edit target.
The signal position of the effects as a whole is as follows.
(sound of each voice) → Slot 1 → Slot 2 → Slot 3 → Slot 4 → Slot 5 → Patch Volume → Master Volume → output
In other words, all of the effects sit before Patch Volume. This lets you adjust only the level of the whole patch after building up the effects (for Patch Volume, see 9.4).
Slot Structure (Type + 8 Knobs + Bypass)
Internally, the contents of each slot are made up of the following elements.
| Element | Role |
|---|---|
| Type | The type of effect assigned to that slot (Off + 12 types). |
| 8 generic parameters | Eight slots whose roles are assigned per effect. The number of knobs displayed, their labels, units, and ranges change depending on the Type. |
| Bypass | A switch that temporarily disables only that slot (the dot at the left edge of the tab). |
The meaning of the 8 generic parameters changes according to the selected effect. For example, even with the same "Rate" label, the role differs between a Chorus Rate and a Phaser Rate. Only the knobs actually used by that effect are displayed (no knob appears for an unused slot).
Effect knobs also support direct numeric entry, just like the knobs on the main panel: double-click the knob or click its value readout (§3.1.1). Since effects have no counterpart on the original hardware panel, input is accepted only as raw values in the knob's displayed unit (Hz / % / ms, etc.). Selector-style knobs such as Model / Mode are not available for numeric entry.
Caution
When you change a slot's Type, that slot's 8 parameters are rewritten all at once to the initial values of the newly selected effect. For example, selecting Digital Chorus resets Rate / Depth / Mix / Feedback and so on to that effect's "sensible initial values." Any knob settings you had crafted earlier are lost, so be mindful of the order when changing the type.
Reordering Tabs (Rearranging the Signal Order)
Dragging a tab body horizontally lets you rearrange the order of the slots (i.e., the order of signal processing). For example, you can change "Delay → Reverb" to "Reverb → Delay".
- A light press on a tab (a movement of less than 5 pixels) simply switches the slot selection as usual.
- Dragging slightly to the side enters reordering mode, and the slot is inserted at the position where you release it.
Copying / Pasting the Whole Effect Chain
The "Copy / Paste" buttons at the lower right of the effects area let you copy and paste all 5 slots (each slot's Type, 8 parameters, and Bypass) together. This is handy when you want to bring a combination of effects you like into another Patch, or to copy settings to the Synth-80 FX plug-in.
9.2 Effect Chain Lock
The EFFECT LOCK button at the top of the PATCH VOLUME column on the far right is a switch that keeps the effect chain even when you switch Patches.
- Lock OFF (unlocked): As usual, loading a Patch loads the effect settings saved in that Patch.
- Lock ON (locked): Even when you load a Patch, the effect-related settings are not overwritten, and the current settings are kept. This is handy when you want to keep swapping the sound while comparing it through the same effects.
Note
Effect Chain Lock protects only the effect chain. Patch Volume is not subject to the lock, and switching Patches updates it to that Patch's value as usual.
9.3 Description of Each Effect
From here, we describe the 12 effects that can be assigned to a slot. The label, unit, range, and initial value of each knob are shown as well.
The "Initial value" in the tables is the actual value set immediately after selecting that effect. Knobs shown in % are basically 0–100%, while some stereo-width parameters (Width) are 0–200% (100% being center).
Off
Disables the slot. There are no knobs. Set slots you are not using as effects to this.
Synth Chorus
A chorus aiming to reproduce the BBD chorus circuit built into Japanese poly synths (JUNO-60 / JUNO-106). Rate / Depth are fixed values within the model; rather than being adjusted by the user, this reproduces the feel of the classic synth choruses you select with a button.

| Label | Unit | Range / Choices | Initial value | Role |
|---|---|---|---|---|
| Model | — | 60 / 106 | 60 | The circuit lineage being modeled. 60 is a somewhat darker, thicker blend; 106 is a little brighter with a stronger sense of stereo inversion. |
| Mode | — | I / II / I+II | I | The operating mode of the fixed chorus. I = slow, gentle spread; II = deeper modulation and doubling; I+II = an effect like a rotary speaker. |
| Width | % | 0–200% | 100% | Stereo width. 0% = mono, 100% = original width, 200% = wider. |
| Amount | % | 0–100% | 100% | The strength of the effect, from dry to the chorus circuit output. |
Studio Chorus
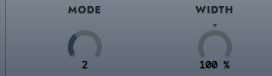
A 2-BBD matrix chorus aiming at a studio rackmount chorus (Roland Dimension D type). It produces preset-like textures using only the four Mode choices.
| Label | Unit | Range / Choices | Initial value | Role |
|---|---|---|---|---|
| Mode | — | 1 / 2 / 3 / 4 | 2 | Rack-chorus-style mode presets. 1 = a longer delay for a soft, restrained spread. 2 = a shorter delay and deeper modulation, adding thickness and spread. 3 = faster movement for a studio-chorus-like spread. 4 = an emphasized setting that pushes Mode 3's wet a little further forward. |
| Width | % | 0–200% | 100% | The width of the generated chorus component. 0% = no wet-side spread, 100% = default, 200% = wider. |
Pitch Chorus
A detune chorus in the style of 1980s rack harmonizers that creates thickness by slightly shifting the pitch. Its principle differs from other choruses that wobble the delay time with an LFO: it makes the left and right voices slightly different in pitch and produces the spread from that beating.

| Label | Unit | Range | Initial value | Role |
|---|---|---|---|---|
| Pitch A | cent | −50 to +50 cent | +9 cent | The pitch shift amount of Voice A (left). |
| Pitch B | cent | −50 to +50 cent | −9 cent | The pitch shift amount of Voice B (right). Setting it to the opposite sign of A produces the classic 1980s rack-detune stereo spread. |
| Delay A | ms | 0–500 ms | 0 ms | A fixed delay applied to Voice A after pitch shifting. |
| Delay B | ms | 0–500 ms | 25 ms | The fixed delay for Voice B. 10–30 ms gives a slap-style stereo feel; beyond that, a layered echo. |
| Mod Depth | % | 0–100% | 10% | The amount by which the LFO wobbles the pitch shifter's read position (up to ±2 ms). At 0, a completely static detune. |
| Mod Rate | Hz | 0.05–6 Hz | 0.50 Hz | The LFO speed of the wobble above. |
| Feedback | % | 0–100% | 0% | Returns the pitch-shifted signal to the input. When detune is applied, this produces "pitch dive / rise" type effects. |
| Mix | % | 0–100% | 50% | Wet / Dry mix (equal-power crossfade). |
Digital Chorus
A general-purpose digital chorus. It runs multiple Voices in parallel and uses Detune to scatter how each Voice wobbles, creating thickness and spread.

| Label | Unit | Range / Choices | Initial value | Role |
|---|---|---|---|---|
| Rate | Hz | 0.05–6 Hz | approx. 1.52 Hz | The speed of the LFO that wobbles the delay time. |
| Depth | % | 0–100% | 5% | The LFO wobble amount (the sweep width of the delay time). |
| Voices | — | 1 / 2 / 3 / 4 | 2 | The number of Voices modulated in parallel. The more, the thicker and denser. |
| Detune | % | 0–100% | 30% | The LFO rate spread between Voices. At 0, all Voices share the same rate; raising it makes the movement more complex. |
| Width | % | 0–200% | 100% | Stereo width. 0% = mono, 100% = original width, 200% = wider. |
| Feedback | % | 0–100% | 50% | Recirculates the chorus signal to add depth. |
| Mix | % | 0–100% | 50% | Wet / Dry mix. |
Delay
A digital delay that can switch between tempo sync (Sync) and direct ms specification (Free). For stereo, you can choose Mono or ping-pong.

| Label | Unit | Range / Choices | Initial value | Role |
|---|---|---|---|---|
| Mode | — | Sync / Free | Sync | How the delay time is specified. Sync = synced to the host BPM, Free = direct ms specification. |
| Time (Sync) | note value | 1/64–1/2 | 1/8 | The note value when synced to BPM. Displayed only when Mode = Sync. |
| Time (Free) | ms | 1–2000 ms | 350 ms | The delay time when in Free. Displayed only when Mode = Free. |
| Stereo | — | Mono / Ping-Pong | Mono | How the stereo sounds. Ping-Pong applies the delay alternately to the left and right channels. |
| Feedback | % | 0–95% | 40% | The feedback amount. The larger it is, the more repeats. Capped at 95% to prevent oscillation. |
| Tone | Hz | 500–18000 Hz | approx. 8 kHz | An LP filter in the feedback path. Low is dark (tape / BBD type), high is bright (digital type). |
| Width | % | 0–200% | 100% | The stereo width of the delay output. Has no effect in Mono mode. Center detent (100%). |
| Mix | % | 0–100% | 30% | Wet / Dry mix. |
Phaser
A phase effect with a multi-stage cascade of all-pass filters. It sweeps notches (dips) along the frequency axis to create an undulating texture.

| Label | Unit | Range / Choices | Initial value | Role |
|---|---|---|---|---|
| Rate | Hz | 0.05–10 Hz | approx. 0.13 Hz | The LFO sweep speed. |
| Depth | % | 0–100% | 85% | The amplitude by which the notch frequency is wobbled. |
| Feedback | % | 0–97% | approx. 70% | The feedback amount. Raising it sharpens the notches and makes them resonant. |
| Stages | — | 4 / 6 / 8 / 12 | 8 | The number of cascaded all-pass stages. The more, the more notches and the denser the sweep. |
| Center | Hz | 200–4000 Hz | approx. 1200 Hz | The center frequency of the sweep. Higher makes the notches stand out in the mid-high range. |
| Stereo | — | Mono / Stereo | Stereo | Stereo offsets the L / R LFO phase by 90° for a wide undulation. |
| Mix | % | 0–100% | 100% | Wet / Dry mix. |
| Sharp | — | 0.5–4.0 | approx. 1.15 | The Q of each all-pass (the sharpness of the notches). |
Note
For the Phaser, the phase interference between the dry and wet sounds is itself the heart of the effect. For this reason the initial Mix is 100% (fully wet). Lowering Mix weakens the interference component and makes the effect more subtle. Real pedals also have no concept of Dry / Wet, and 100% is standard.
Flanger
A flanger that creates a comb filter by wobbling a very short delay. It is characterized by a metallic undulation like a jet plane passing by.

| Label | Unit | Range / Choices | Initial value | Role |
|---|---|---|---|---|
| Rate | Hz | 0.05–8 Hz | approx. 0.30 Hz | The LFO speed. |
| Depth | % | 0–100% | 60% | The amplitude by which the short delay time is wobbled. |
| Feedback | % | 0–97% | approx. 80% | The feedback amount. Raising it makes the comb peaks stand out, giving a metallic jet feel. |
| Manual | ms | 0.5–12 ms | approx. 2 ms | The static central delay time. Together with Depth, it determines the notch position. |
| Stereo | — | Mono / Stereo | Stereo | Stereo offsets the L / R LFO phase by 180° for a wide jet feel. |
| Mix | % | 0–100% | 100% | Wet / Dry mix. |
| Color | — | Normal / Inv | Normal | The polarity of the comb. Inv is an inverted (subtractive) comb, with a hollow, scooped character. Combined with TZF, all frequency bands cancel out at the instant of the zero crossing. |
| TZF | — | Off / On | Off | Through-Zero flange. A tape flange in which the modulated tap "crosses zero" past the dry reference point. Because a delay equal to Manual is added to the wet, Mix 100% is recommended. |
Note
Like the Phaser, the heart of the Flanger is the comb interference between the dry and wet sounds. The initial Mix is 100% (fully wet); lowering Mix weakens the interference and makes the notches shallower.
EQ
A 3-band equalizer with Low / Mid / High. Each band has gain and frequency knobs. The gain can cut boldly (up to −36 dB), while the boost side is modest (up to +12 dB) — an asymmetric range inspired by the Kill EQ of a DJ mixer.

| Label | Unit | Range | Initial value | Role |
|---|---|---|---|---|
| Low Gain | dB | −36 to +12 dB | 0 dB | Low shelf gain (0 dB is the center detent). |
| Low Freq | Hz | 50–500 Hz | approx. 200 Hz | The corner frequency of the Low shelf. |
| Mid Gain | dB | −36 to +12 dB | 0 dB | Mid peak gain (0 dB is the center detent). |
| Mid Freq | Hz | 200–5000 Hz | approx. 1000 Hz | The center frequency of the Mid peak. |
| High Gain | dB | −36 to +12 dB | 0 dB | High shelf gain (0 dB is the center detent). |
| High Freq | Hz | 2000–12000 Hz | approx. 5000 Hz | The corner frequency of the High shelf. |
Note
The three Gain knobs have a detent at the center (0 dB), and the strength of the effect changes between the cut and boost sides across that point. It can be used both for boldly removing low or high frequencies (Kill) and for gently lifting them.
Compressor
A compressor with four switchable characters (Mode). Even when you change the Mode, the Threshold / Ratio / Knee and other knobs work in common.

| Label | Unit | Range / Choices | Initial value | Role |
|---|---|---|---|---|
| Mode | — | Clean / Opto / FET / Vari-Mu | Clean | The character of the detector / curve. |
| Thresh | dB | −60 to 0 dB | −12 dB | The threshold. Signals exceeding it are compressed. |
| Ratio | :1 | 1:1–20:1 | 4:1 | The compression ratio. Larger means stronger compression (closer to a limiter). |
| Knee | dB | 0–24 dB | 6 dB | The soft-knee width. Wider makes the transition around the threshold smoother. |
| Attack | ms | 0.1–200 ms | approx. 10 ms | The speed of response to crossing the threshold. |
| Release | ms | 5–1000 ms | approx. 100 ms | The speed at which gain reduction recovers after the signal falls below the threshold. |
| Mix | % | 0–100% | 100% | Wet / Dry mix. |
Mode choices
| Choice | Meaning |
|---|---|
| Clean | A transparent VCA type. The fastest and most neutral, acting straightforwardly according to the set values. |
| Opto | An optical-compressor-style curve. Program-dependent and smooth, with slower onset and release. |
| FET | A fast, aggressive 1176 type. The attack is snappy and punchy. |
| Vari-Mu | A vacuum-tube-style soft knee. The gentlest and most natural compression. |
Note
Because auto makeup (automatic gain compensation) works internally, even the initial Mix of 100% yields a unity-level compressed signal. For parallel compression, lower Mix and blend with the original sound.
Distortion
A saturation / distortion that distorts the input and adds harmonics. You choose the color from 5 algorithms (Algo). The design pushes the signal into the curve with Drive and matches the level with Output.

| Label | Unit | Range / Choices | Initial value | Role |
|---|---|---|---|---|
| Algo | — | Clip / Overdrive / Waveshaper / Tube / Tape | Overdrive | The type of saturation curve. |
| Drive | dB | 0–36 dB | 6 dB | The input gain into the distortion stage. Raising it increases harmonics. |
| Output | dB | −24 to +12 dB | 0 dB | The output trim after distortion (0 dB is the center detent). |
| Mix | % | 0–100% | 100% | Wet / Dry mix. Usually fully wet for flavoring. |
Algo choices
| Choice | Meaning |
|---|---|
| Clip | A hard clip at ±1. A hard, digital-fuzz color dominated by odd-order harmonics. |
| Overdrive | A tanh soft clip. A warm, Tube Screamer type color. |
| Waveshaper | An algebraic soft saturation. A gentler curve than tanh with a distinctive "fizz." Being a symmetric function, odd-order harmonics dominate. |
| Tube | An asymmetric curve (compressing the positive side more strongly). It emulates the cathode bias of a class A vacuum tube, bringing up even-order harmonics. |
| Tape | A round-knee saturator. With a rounder knee than tanh, it has the gentle color of tape saturation. There is no envelope-following compression element (coloration only). |
Reverb
An algorithmic reverb that adds space. You can switch among three modes: Hall / Plate / Room.

| Label | Unit | Range / Choices | Initial value | Role |
|---|---|---|---|---|
| Mode | — | Hall / Plate / Room | Plate | The reverb algorithm. |
| Pre-Delay | ms | 0–200 ms | 35 ms | The delay before the reverb tail begins. |
| Decay | s | 0.3–10 s | approx. 2.7 s | The target RT60. The time for the tail to decay by 60 dB. |
| Damping | % | 0–100% | 35% | The high-frequency damping inside the tank. Raising it makes the tail darker over time. |
| Diffusion | % | 0–100% | 50% | The density of the tail. 0% = sparse (discrete echoes), 100% = a dense, smooth tail. |
| Tone | % | 0–100% | 50% | The tonal balance of the reverb output. Low is darker, high is brighter. |
| Width | % | 0–200% | 100% | Stereo width. 0% = mono, 100% = normal stereo, 200% = wider. |
| Mix | % | 0–100% | 15% | Wet / Dry mix. |
Mode choices
| Choice | Meaning |
|---|---|
| Hall | A smooth, high-density, lush, long tail. Suited to pads and long ambience. |
| Plate | An algorithm inspired by 1980s digital reverbs. Dense and bright from the start, a metallic studio plate reverb. |
| Room | Parallel L / R loops. The discrete early reflections come quickly and the tail is shorter. An intimate character of a small space. |
Arpeggiator
An arpeggiator that plays the held notes one at a time, in sequence, synchronized to the host tempo.
Unlike the other effects, what this slot processes is notes (performance data), not audio. The audio passes straight through, so the result is the same no matter where in the chain you place it.

| Label | Unit | Range / Choices | Initial value | Role |
|---|---|---|---|---|
| Mode | — | Up / Down / Up-Down / Random / Played / Chord | Up | How the pattern advances (see the table below). |
| Range | — | 1 Oct / 2 Oct / 3 Oct / 4 Oct | 1 Oct | How many octaves the pattern spans. At 2 Oct and above, the held notes repeat one octave higher on each pass. |
| Rate | note value | 1/64–1/2 | 1/16 | The length of one step as a note value, locked to the host BPM (T = triplet, . = dotted). |
| Gate | % | 5–100% | 50% | How long each step sounds, as a percentage of the step length. Short = staccato, long = more sustained. |
| Swing | % | 50–75% | 50% | Delays every second step to create a shuffle feel. 50% = straight, around 67% = a triplet feel. |
| Hold | — | Off / On | Off | Latch. When On, the pattern keeps playing after the keys are released. |
Mode choices
| Choice | Meaning |
|---|---|
| Up | From the lowest note to the highest, then up through the octaves set by Range. |
| Down | Descends from the top note of the highest octave. |
| Up-Down | Ascends, then turns around and descends. The end notes are not repeated. |
| Random | Picks a random held note (and octave) on every step. |
| Played | Cycles through the notes in the order the keys were pressed. |
| Chord | Retriggers all held notes together on every step, cycling through the octaves set by Range. |
Note
- The pattern restarts from the beginning on the first key pressed after all keys are released. The same applies with Hold On: pressing a new key after releasing everything rebuilds the pattern from the new notes.
- While the DAW transport is playing, the steps snap to the host's beat grid, so the arpeggio locks naturally with a running sequence.
- In environments without a host tempo (Standalone / the web version), the clock runs at 120 BPM. On the web version, it follows the MIDI player's tempo while it is playing.
- If you assign Arpeggiator to more than one slot, only the first one in signal order (that is not bypassed) is active.
Tip
At Gate 100%, the steps tie together legato. Setting ASSIGN to Solo / Unison and raising GLIDE produces a "gliding arpeggio" that slides smoothly between the pitches of the steps (for ASSIGN / GLIDE, see → Chapter 8 "Patch / Performance Reference").
9.4 Patch Volume
At the far right of the effects area is a PATCH VOLUME knob independent of each slot. This is for adjusting the final volume of the whole Patch; its signal position is "after all effects, before Master Volume."
- The range is ±12 dB bipolar (center = 0 dB), with a detent at the center.
- Holding
Ctrl(Cmdon macOS) and clicking resets it to 0 dB. - You can also type in a dB value directly by double-clicking the knob or clicking its value readout (§3.1.1).
- Since the volume balance among the effects within the slots does not change, you use it to adjust only the level of the whole patch after building up the effects.
Note
Patch Volume is saved in the Patch (.80p). As noted above, it is not protected by Effect Chain Lock, so even with Lock ON, switching Patches loads the new Patch's Patch Volume.
9.5 Automation and MIDI Learn
The knobs of each effect, the slot Type / Bypass, Effect Chain Lock, and Patch Volume are all targets for DAW automation. You can also assign MIDI CCs to operate them from an external controller. For how to assign them, see → Chapter 10 "MIDI / MIDI Learn / Automation".
Note
The slot Type is an enumerated value that internally includes reserved stages. If automation lands on a reserved value that is not implemented, it is treated as Off.