
5. Understanding Preset / Patch / Tone
In this chapter, we explain the way to think about managing sounds in Synth-80. The basic structure is that of the unit of storage — "what becomes one file" — and that a single sound is built from two Tones called Upper / Lower.
What each individual parameter does is covered elsewhere: for Tone parameters, see → Chapter 7 "Tone Parameter Reference"; for performance settings such as Key Mode and Balance, see → Chapter 8 "Patch / Performance Reference"; and for Effects, see → Chapter 9 "Effects".
5.1 The Patch Is the Unit of Storage
In Synth-80, the unit of storage is the Patch. When written out as a file, it uses the extension .80p. A single Patch contains all of the following:
- Upper Tone (the Upper sound)
- Lower Tone (the Lower sound)
- Performance settings (Key Mode / Balance / Octave Shift / Assign Mode / Glide, etc.)
- Effect Chain (the 5-slot Effects)
- Patch Volume (the volume of each Patch)
In other words, loading a single Patch reproduces everything at once: the two sounds, how the layers are combined, the effects, and the volume.
Note Mapping this to the on-screen color coding: the white sections (the Upper / Lower sounds) are Tone, and the light-blue sections (settings related to performance and layering) are Patch scope. Think of a Patch file as saving both the white and the light-blue together as one. For the color coding itself, see → Chapter 4 "Screen Tour".
The File Name Is the Authoritative Patch Name
For both Patch names and Tone names, the file name itself is the sound's name. Therefore, if you rename a file in Explorer or Finder, that name becomes the display name in Synth-80 as well.
5.2 The Two-Layer Upper / Lower Structure
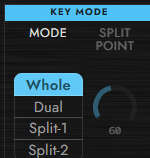
A single Patch holds two sounds: an Upper Tone and a Lower Tone. Key Mode determines how these two are combined and played.
| Key Mode | How it sounds | Voices | Notes |
|---|---|---|---|
| WHOLE | Upper Tone only. Sounds across the entire keyboard | Up to 8 voices | Lower is disabled (does not sound) |
| DUAL | Layers Upper and Lower on the same key | 4 voices each for Upper / Lower | BALANCE sets the volume ratio between the two |
| SPLIT 1 | Split by key range. Lower side = Lower, upper side = Upper | 4 voices each for Upper / Lower | The internal Split Point sets the boundary. The MIDI channel is shared |
| SPLIT 2 | Split by MIDI channel. Basic ch = Upper, basic ch + 1 = Lower | 4 voices each for Upper / Lower | Sounds are routed across two channels |
The key points are as follows:
- In WHOLE, only Upper sounds. Because the Lower parameters do not affect the sound here, the Lower parameters are shown dimmed on screen.
- In DUAL / SPLIT, the voices are divided. Since the 8 voices are shared between Upper and Lower, each gets up to 4 voices. Keep this in mind when considering how many notes you can play in a chord at once.
- The way DUAL layers differs slightly from the hardware. On the actual MKS-80, DUAL — like SPLIT 2 — also splits Upper / Lower by MIDI channel, so layering required sending the same note to two channels. In Synth-80, to make this easier to handle in a DAW, this has been changed so that received notes are simply layered regardless of channel.
A clause-by-clause explanation of the meaning of each Key Mode option, as well as of performance parameters such as Split Point and Balance, is collected in → Chapter 8 "Patch / Performance Reference".
5.3 Switching the Upper / Lower Edit Target
The group of white sections occupying the upper part of the screen (the Tone editor) displays and edits the sound of either Upper or Lower. Which one you edit is switched with the UPPER TONE / LOWER TONE tabs in the top bar.
- Normally it is shown collapsed, displaying only the one channel — Upper or Lower — that you are currently editing. Switching tabs swaps the edit target for the entire Tone editor.
- Pressing the expand button in the top bar lets you display the Upper block and the Lower block simultaneously, stacked in two rows. This is convenient when building two sounds for DUAL / SPLIT while comparing them.
- The link icon between UPPER TONE and LOWER TONE switches whether editing is linked between Upper and Lower when both are the same sound.
For the on-screen positions of the collapse/expand controls and the link icon, see → Chapter 4 "Screen Tour".

5.4 Loading a Sound from Another Patch (Replacing a Tone)
Although a Tone does not exist as a standalone file, you can load the Upper / Lower held by another Patch into a layer (Upper or Lower) of the Patch you currently have open. To do this, press the v button on the right side of each TONE tab to select an existing Patch's Tone and replace it.
For example, you can do things like "bring the Upper sound of Patch A into the Lower of Patch B and layer it."
Note
Even if you replace a Tone, the unit of saving is still the Patch (.80p). If you want to keep the combined result, save it as a Patch.
5.5 Init Patch (Returning to the Initial State)
When you want to return all parameters to their default values, load the Init Patch. This is a built-in initial state that requires no file (internal identifier builtin:init), and it is a full-reset means of returning all parameters — including the sound, performance settings, and effects — to their defaults.
Use it when you want to start sound design from a blank slate, or when you want to clear your current settings once and return to a reference point.
5.6 Saving, Loading, Navigating, and Categories
Everyday Patch operations are performed from the top bar at the very top of the screen (the light-blue Patch frame).
- Save As: Saves the current Patch as a new
.80pfile. As noted above, the file name becomes the Patch name directly. - Load: Click the Patch name and load a saved
.80pfrom the menu that appears. To compare sounds while searching by name or tag, use the preset browser (→ 5.7). - Navigate forward/back: The left/right arrows let you step forward and back through the Patches within the same category. This is convenient when switching one after another to compare sounds. After you load a Patch from filtered results in the preset browser, the arrows cycle through those results.
- Category folders: Patches are organized into per-category folders (
Bass/,Lead/,Pad & Strings/, etc.). Selecting a category makes the Patches within that folder the target.
For where Presets are stored (the folder structure under Documents) and how Factory presets are handled, see → Chapter 2 "Installation, License Activation, and File Locations".
5.7 Preset Browser
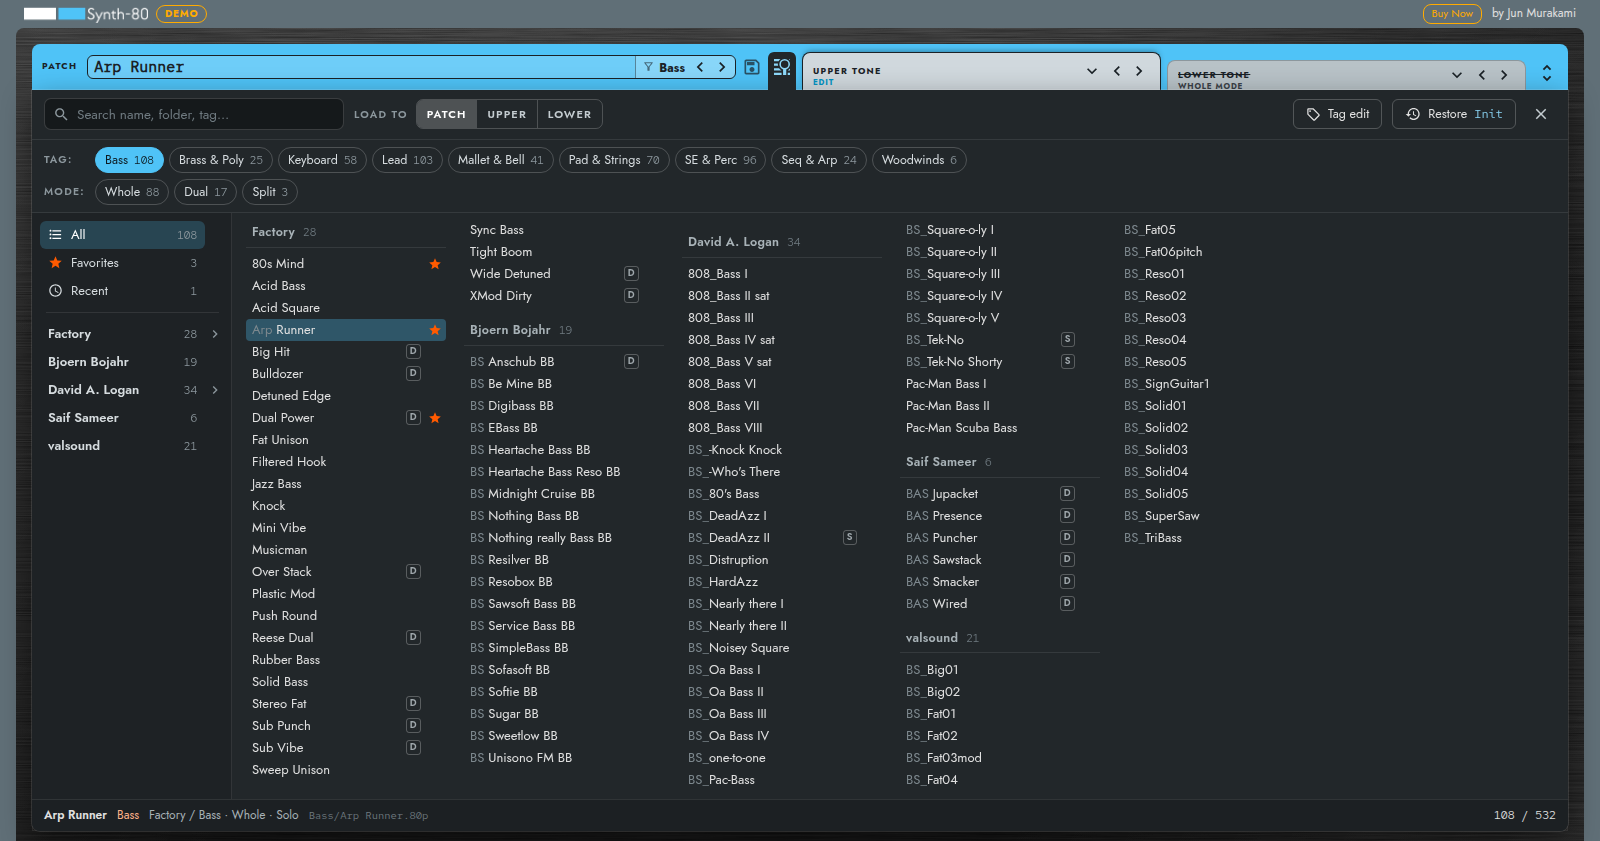
Press the Preset browser button to the right of the save button in the top bar to open the browser below the top bar. It lists every Patch in the library, so you can filter by search and tags and compare sounds as you play. Press the button again, or the × at the upper right, to close it.
Filtering
- Search field: Matches part of the name, folder name, sound designer, tags, and Key Mode, ignoring upper and lower case. Words separated by spaces narrow the list to Patches that contain all of them (AND).
- TAG: Filters by tags that describe the type of sound (nine tags such as Bass, Lead, and Pad & Strings). When you select several, Patches that have any of those tags are shown (OR).
- MODE: Filters by Key Mode (Whole / Dual / Split). Split covers both SPLIT 1 and SPLIT 2.
- Left column: Choose from All, Favorites (★), Recent, Factory (bundled), a folder for each sound designer, and User (Patches you saved yourself). Click the
>to the right of a count to show the folders inside and choose a single folder.
The search field, TAG, MODE, and the left column combine, and only Patches that meet all of them are shown. The number on each chip is the count you would get by choosing that chip under the other conditions; chips with zero results are dimmed.
In the list, Dual Patches are marked D and Split Patches S. The bottom row shows the selected Patch's name, tags, sound designer and folder, Key Mode, Assign Mode, and file location, along with the number of filtered results and the total.
Auditioning and Choosing
- Clicking a row loads that Patch immediately. The ↑↓ keys also load the previous and next Patches in turn, so you can compare them while playing. The ←→ keys load the Patch in the next column.
- Enter keeps the current Patch and closes the browser. Esc also closes it (the last Patch you loaded stays loaded).
- Restore returns to the sound you had when you opened the browser, unsaved edits included. Use it when, after comparing, you prefer the original. The name you will return to is shown to the right of Restore.
- Pressing Enter or ↓ in the search field loads the first filtered result and moves to the list.
LOAD TO (Loading Only a Tone)
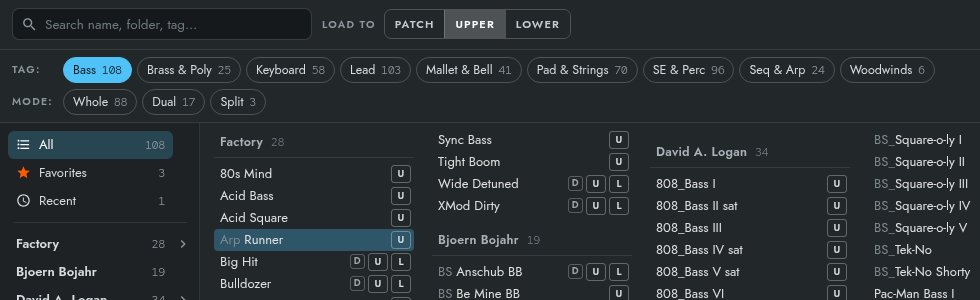
LOAD TO, to the right of the search field, chooses where a Patch picked in the list is loaded.
- PATCH (default): Loads the whole Patch.
- UPPER / LOWER: Loads only a Tone of the chosen Patch into the Upper / Lower of the Patch you have open (→ 5.4). U / L buttons appear on each row so you can choose whether to take the source Patch's Upper or Lower. Clicking the row itself takes the source Upper with UPPER and the source Lower with LOWER. A Whole Patch's Lower is the same as its Upper, so only U is shown.
LOAD TO returns to PATCH each time you open the browser.
★ and Recent
- Hover over a row to show a ★ at its right end; click it to add the Patch to or remove it from Favorites. You can also do this from the row's right-click menu.
- Recent lists up to 30 recently used Patches, newest first. Loading alone does not add a Patch: it is added after it has stayed loaded for 15 seconds, when you edit it, when you close the browser with Enter, or when you save. This keeps Patches you only skimmed with the arrow keys or ◀▶ from filling the list.
- ★ and Recent are saved as per-user settings and shared by every instance.
Tags and Tag Editing
A Patch's tags are determined in this order:
- Tags saved in the file (
meta.tagsin the.80p). - If the file has none, one tag from the folder name (
Bass/,Lead/, and so on). - If there is still none, one tag from the abbreviation at the start of the name (
BS_,LD, and so on).
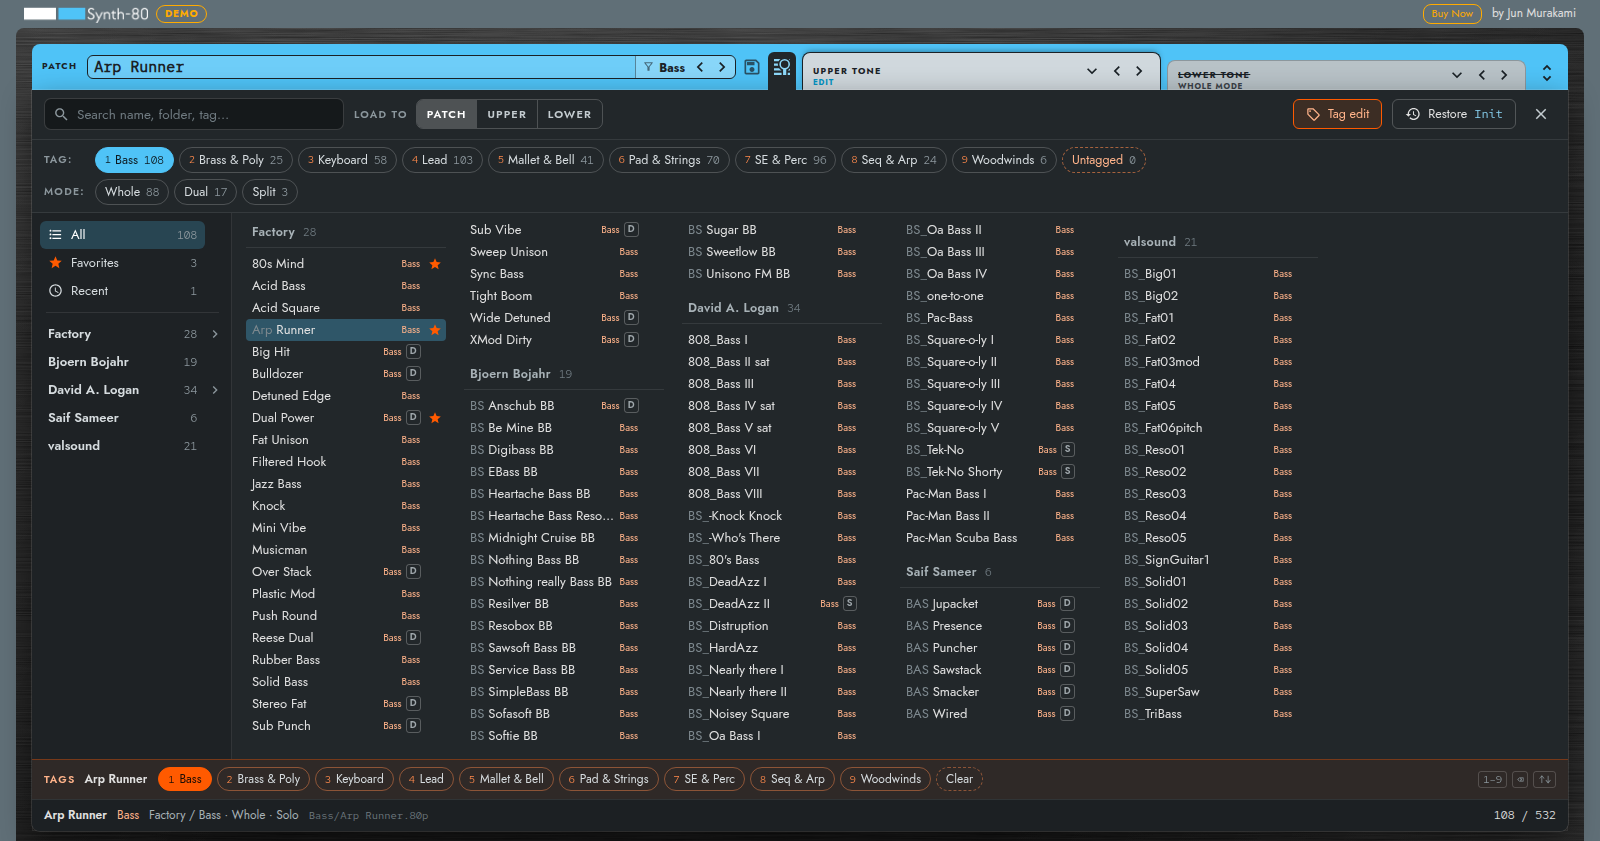
Press Tag edit to enter tag editing: each row shows its tags, and a tag editing bar appears at the bottom.
- Toggle tags on the selected Patch with the number keys 1–9 (in TAG order) or the buttons on the bar. A Patch can have several tags.
- Backspace (or Delete), or Clear on the bar, removes all tags from that Patch.
- Use the ↑↓ keys to move to the next Patch and keep tagging. A Patch whose tags you changed stays in the list until you move on, even if it no longer matches the filter.
- Untagged appears in the TAG row, letting you show only Patches without tags.
- You can also toggle tags from the row's right-click menu.
Tags are saved to the .80p file each time you change them. The sound values and the file name do not change. Tags are kept when you overwrite the same file. The built-in Init cannot be tagged.
Note
On the first start after an update, if a copy of a bundled preset in Documents has no tags, the bundled tags are added to it. Its sound values, file name, and any tags you added yourself are not touched.
Cycling Range of ◀▶ and MIDI CC

After you load a Patch from filtered results in the browser, the forward and backward arrows in the top bar cycle through those results instead of the folder. The folder name in the name field changes to a filter mark and the name of the filter (for example, Bass or Bass · Dual); click it to open the browser.
- MIDI CCs assigned to the arrows (→ Chapter 10) cycle through the same range.
- Choosing a Patch from the top bar's menu returns to cycling by folder.
Filter conditions and whether the browser is open are kept for each plugin instance, so closing and reopening the editor brings back the same state. They are not saved in the DAW project or in the Patch.
Keyboard Shortcuts
These keys work while the list has focus.
| Key | Action |
|---|---|
| ↑ / ↓ | Load the previous / next Patch |
| ← / → | Load the Patch in the adjacent column |
| PageUp / PageDown | Jump further and load |
| Home / End | Load the first / last Patch |
| Enter | Choose and close the browser |
| Esc | Close the browser (in the search field, clears the search text if there is any) |
| 1–9 | Toggle tags (while tag editing) |
| Backspace / Delete | Remove all tags (while tag editing) |
5.8 Effect Chain Lock (Replacing the Sound Only)
While designing sounds, there are situations where you want to "try out various sounds (Tones) while keeping the way the effects are applied the same." This is where Effect Chain Lock comes in handy.
When Effect Chain Lock is ON, even if you load another Patch, the Effects-related settings contained in that Patch will not overwrite your current Effect Chain, which is preserved. With the effects fixed, you can swap through Patches one after another and compare their sounds.
Note The target of Effect Chain Lock is the Effects-related parameters. Patch Volume is not subject to the lock and switches to the value of the loaded Patch as usual.
For the makeup of the Effect Chain and the details of each effect, see → Chapter 9 "Effects".